Monday, January 13, 2014

Hand Crafted Pebble SmartWatch Pocket Watch and Fob

The Pebble Smart Watch Dressed in Leather and Silver
The case and pocket watch I carried until college. 
When I was a kid there was a hill behind our house. It had the foundation of one of the first cabins in the area. It belonged to a preacher named Broad. I got this story from the old folks in the area that are long since gone. I did hear of indian attacks on the cabin and how they would shoot back at them from the rock foundation the house sat on.

I say all that to say this - I like things from the past. I especially like things from the 1860's to the 1880's. As a teenager I carried a pocket watch my Dad gave me. It was an Elgin with the spring loaded top.


Lately I have been interested in the new smart watches coming out. First I looked at the Pebble and dismissed it. Then I looked at the alternatives. I didn't want to spend so much I would feel bad about the purchase later so I kept on looking. Then I looked a the Nano 6th gen. It was cool but since Apple abandoned it I figured it had no future. Then I got back on the Pebble.


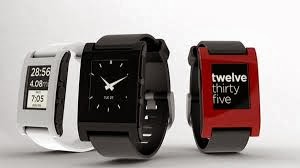
I wear vests and while I could have got one of my old pocket watches running I figured I could spend the same (or less) on a Pebble. I also know that ultimately the pocket watch will break again. Plus, I love my technology and the Pebble watch looks like something I should own.

I waited until after Christmas and hit ebay. Sure enough there were plenty of Pebble watches at a Buy It Now price around $100. I had one in my hand 3 days later.


I like what it can do but I didn't love the way it looked and I wanted to carry this thing as a pocket watch. I thought of a lot of different ways to do that but the only practical way seemed to be with leather. I have not messed with leather since I was a kid so I hit the Tandy leather store and bought some supplies.


The Watch Fob
The Pebble leather cover. 


The leather and the Pebble cover that the leather will live on. 
The question was how to attach the leather to the Pebble without harming it. I found a nice cover for $15 that snaps on and off. Now my leather piece can be removed easily and I can put a band on (that I will make out of leather) any time I want. I also wanted a fob. I measured my buckles and it only took two tries before I had what I wanted (shown above).

Cutting the leather and getting everything just right took some doing but I finally got things looking good.

With a little creative thinking and some trail and error I wound up with almost exactly what I saw in my head - a good looking, practical way to carry my Pebble in my vest via an 1880s silver watch chain.
The final product - A Pebble pocket watch. 


Saturday, November 2, 2013

Hand Tooled Leather Meets the Griffin Separates - A Cowboy's Dream

The Custom Cowboy iPhone Case - Griffin Separates Meets the West
I'm was raised on a ranch in Texas that in past times had stage coaches running on it and indian attacks on the log cabin on the hill behind our house. My dad bought me my first real cowboy boots and hat when I was 5 years old. All that to say that for years I have been looking for the perfect iPhone case that would protect it but still have some western flair.

The Hunt
While doing an extensive Google search on "tooled leather iPhone 5" I found a case made by Nocona Boots. I'm familiar with Nocona because the factory is not that far from where I was raised. Nocona is named after the famous Comanche indian chief Peta Nocona. His son was the famous Qaanah Parker.


The Nocona iPhone case had the tooled leather I wanted but the case itself offered no protection from drops. I spoke with Mark from Griffin Technology and he told me about their "Separates" line of cases. These are cases that consist of a bumper and a removable back plate. You can switch out the back plate for different looks.


I took my Nocona case and carefully peeled the hand-tooled leather piece off.


Then I took Shoe Goo and applied it to the Griffin Separates back plate.


Now I have the iPhone case I have always wanted - a hand tooled leather back with a protective bumper for drops.

Thanks to Mark and Griffin Technology!


Sunday, June 9, 2013

The Kick Ass 1 Watt Amp!

The One Watt Amp

So I have lots of 12/15/36/100/130 watt amps.
I like to sit on the back porch and play the blues.
All my Mustang modelers have died on me and I was on the hunt for something tubey.
I stumbled on the HT-1RH 1W. It had the features I needed:
* Low wattage
* MP3 input for backing tracks
* Reverb
* Tubes (push pull)
* Great price

I was also looking at old Fender Champs, Valco amps, Vintage 47 amps, Silvertone etc.

I finally landed on a 1 watt tube amp:

The patented ISF (Infinite Shape Feature) circuit gives you infinite adjustment over the characteristics of the tone control network and takes you from the USA to the UK and anywhere in between. Add a fully specified speaker emulated output, MP3/ Line Input and you have everything you need for recording or practicing.

So the question was how to do take the HT-1RH 1W and also have a cool look?

I put together an extension cab for my 57 Tweed Deluxe - oiled pine wood, potatoe sack grill cloth, Jensen Electric Lightening speaker.


I started out with a pine 12 inch extension cab with a Jensen Electric Lightening.
When the HT-1RH showed up I played it for a while and then I pulled the amp out of the head.
It's held on with the 4 screws that are holding the rubber feet on.


I pulled the back wood off the cab and started playing with ways to get the amp in there.
I could have installed it flat on the bottom of the amp but I thought it would be safer and more accessible on the top.


I put a piece of paper over the bottom of the cab and made a template for the holes.

I made my marks and drilled the four holes in the top of my cab (two were under the handles, so they are hidden. The amp was screwed on tight using the screws from the cab.


It was super simple.

I used the cab wood back plate to go around the amp face and I left the bottom open.
I figured the amp would be pointed away from me most of the time anyway.


I put on a cable keeper to keep from yanking out the power chord.

The cool part is that I can still use the cab for my 15 watt 5e3 if I want as well.

The one watt concept really works. I try to sit on my back porch and play every day. My 57 Tweed was jut too loud. I can get the Blackstar Ht-RH cranked up and get some really rich blues tones. I'm getting killer harmonics as well.


I'm really liking the tone and I really dig I can get some Fender type tweed tones and rounded off Marshall tones. 
My final thoughts - a 1 watt, pine combo with a 12 inch speaker? - SICK!!!

Take a listen. My neighbor, and killer guitar player, Karl plays as I jibber jabber:

Sunday, March 31, 2013

Seymour Duncan BG-1400 Pickup Wiring Schematic (BG1400)


Are you the proud new owner of the Billy Gibbons 1400 - AKA BG1400, BG-1400?
Are you wondering how the hell to wire this thing?

Well so was I and I'm here to tell you what I have learned.


First the why - The BG 1400 was designed for and by Billy Gibbons of ZZ Top fame.
This is a custom shop pickup but at $150 it's pretty reasonable. I think Billy was looking for something to put in the bridge cavity of his Esquire but wanted a humbucker.
This is a stacked humbucker. It's really tall but it fit in two Telecasters I tried without an issue.
I have a think for the Bigsby B16 and your only option there is a single coil pickup.
This is why I wanted the BG-1400. It looks stock, will fit in my B16 but is a four wire humbucker with lots of options.

I tend to get as complicated as possible in the wiring dept. and this build was no different. 


I have tried 3 way wiring:

http://dl.dropbox.com/u/7440801/Guitar%20Wiring/EsquireH-3-Way8.jpg
This taught me one thing - you want the outside option. The inside doesn't sound good at all.
I also learned that the tone variations in this 3 way scheme didn't vary that much and I ditched it.

I tried 4 way wiring:
http://dl.dropbox.com/u/7440801/Guitar%20Wiring/Esquire4-Way3.jpg
This just didn't give me the options I wanted. 
Straight to jack didn't sound much different to me than volume and no tone.
Volume and tone sounded about the same as the other two.
The Eldred mod was interesting.

EUREKA! A Great BG 1400 Wiring Schematic!
Then after wiring and rewiring I found a scheme that totally took at advantage of the BG1400's stacked humbucker design.  You need a Telecaster 5 way super switch for this. Mine fit in my Tele with no modifications.

http://dl.dropbox.com/u/7440801/Guitar%20Wiring/EsquireH-5-Way4.jpg
The single coil sounds great.
Coils in parallel is louder and my favorite position.
The  two coked wah positions could be handy.
The humbucker is exactly as stated.

So I felt like this really got just about everything I wanted out of the pickup. 
I spent a lot more time on this wiring job because I wasn't sure what I wanted an no one out there could really help me.

Here is the site where you can find all kinds of wiring schemes:
https://sites.google.com/site/phostenixwiringdiagrams/teles/esquires

One thing to remember is you can use any of the two wire diagrams with the BG-1400. You can simply wire the red and white wires together BUT I highly suggest a push pulll volume or tone pot. You wire the red and white to the center left lug. When you pull it up it sounds louder and clearer.
 Deaf Eddie is a great resource for push/pull tricks:
http://www.deaf-eddie.net/pushpull/pushpull.html

Maybe my favorite setting. There are also instructions with the BG1400 for a simple 3 way switch and boots.
I hope this helps anyone out there looking for options for this great blues/rock Seymour Duncan pickup. Mine lives in my Texcaster I put together.


Thursday, March 14, 2013

The "Walt Guitar" - Walt Wilkins Guild

THE WALT GUITAR
As y'all know I'm a huge Walt Wilkins fan. We have been running around since our college days when we were both young and pretty. Walt was my film instructor at Baylor in Waco. Most of what I want to say is in the video but I was pretty stoked when Josh Grider (another great sing/song writer) dropped off Walt's old Guild acoustic from our early Nashville days. A treasure from the past and to top it all off she is still a great player! Thanks Waltus!

You can check out my interview with Walt here. 
 

Friday, February 15, 2013

Jim T's Friday Story - Elvis Presley and Red

This week's story is about the king of rock, Mr. Elvis Presley. This is the true story of how Elvis used his Karate skills to take Red's gun away from him. The ending isn't pretty...but it's cool!


Sunday, February 10, 2013

The Barncaster - My Hand Built 150 Year Old Tele

 The 150 Plus Year Old Barncaster - Telecaster - By Jim T.
I started really getting into barn wood telecasters a year ago. I love the idea of real barn wood being used for a Tele. I would spend my night doing Google image searches of barncasters and I decided I had to have one. I contacted a great body wood crafter. His company is called Wildwood. He cuts great bodies. He had a few pieces of barnwood left over from another project.

The description of the wood:
That is actually wood from a barn. It is wormy chestnut from one of the chestnut barns in the Cuyahoga Valley in Ohio. Chestnut barns are rare. The wood was stored for about 15 years in a climate controlled room to make picture frames and the builder decided that he was not going to use it. It is 150 plus years old and could be much older. The marks on the horn are saw blade marks from way back when. Lots of nice worm holes and more!


I put the guitar together from all my favorite parts: 
Neck PU - Lollar Imperial Standard wind heavy relic. Thee hand wound humbucker!
Bridge PU - Rio Grande Muy Grande (purchased on TDPRI)
Bigsby - B17 (GRRRRREAT)
Bridge - The stock was good but the Compton has more sustain. He custom made it to fit the B17 bridge.
Knobs - I made these out of 12 gauge shotgun shells and a .45 acp for the switch.
Control Plate - That is a black GFS tele control plate. I just scrubbed it with a green Scotch pad. They may not make this anymore. I had this one laying around.
Wiring - Toneshaper for the Tele. The cool part here is that I can switch from a 500k to 250k pot depending on where I'm at with my switch.
Neck - That is a CEG Hardtail Mighty Mite. I tried many things to get the color right. Plays great. No complaints. I drilled it with a hand drill and everything is straight.
Body - This was custom made and he cut the neck slot with the 4mm angle in it. I bolted on the neck and it was ready to rock!
Nut - Earvana - I love em.
Tuners - GFS Gotoh locking knockoffs. These are great tuners and drop right in. I have put these on several guitars with no issues and they kick ass. I ordered the black ones and scrubbed them with a green scouring pad while watching Smokey and the Bandit. Nicely aged!
String Hold Down - I was popping the strings off the bridge and wanted something to hold them down. I contacted Trussart and he was nice enough to reply to me but he doesn't sell his separately (I knew he wouldn't). I looked over and saw some .357 shells and an hour later I had a killer home brew string retainer!  

This guitar plays and sounds as good as my high dollar Fender Tele, in fact I like it much more. If you have never built your own guitar I highly suggest it. It's fun, rewarding and you get the exact guitar you want.

Here is video of Sam Eakins from Taylor Guitars taking a spin on the Barncaster de Hell: